Commissioning the mechanical ventilation system (MVHR) in a Passive House building is a precise process and it’s very important. It doesn’t have the drama and excitement of the final blower door test … but it’s just as essential to the building’s energy efficiency and comfort. It’s also a required step on the certification checklist. Get some key details right and the ventilation system will work as intended, the energy model will be accurate and the project will proceed smoothly through certification—on this count at least.
If the wrong data is used or the system is incorrectly commissioned or documentation is inadequate, at best it will delay final certification. Additional site visits may be required, with all the cost that entails. At worst, commissioning errors could mean the project fails Passive House certification.
Our team serves as Passive House designers and as certifiers (although never on the same project) so we’ve insights into the multiple points during design and construction where things can go wrong. Read on as I outline what Passive House designers, architects, builders/project managers and MVHR installers all need to know and do to avoid these problems.
Firstly, some reassurance. If you’re a Passive House designer who finds the MVHR commissioning process a bit opaque, you’re not alone. PHI’s process isn’t very clearly communicated. But we’re here to help.
#1 Distinguish between the different air flow rates in the PHPP file—and use the right one
This one’s on Passive House designers to get right. Some designers are getting confused by the way the numbers are presented in the PHPP file. Please look at what I’ve highlighted in the screen shot below:
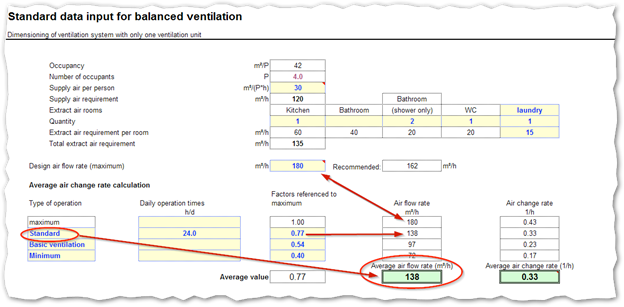
Design air flow rate (maximum)—shown here as 180 m3/h—is the boost rate, designed to run for a short time when ventilation requirements are unusually high eg a long hot shower, a party or lots of steamy cooking*. This value must not be used for commissioning.
The system should be commissioned with the average air flow rate—shown here at 138 m3/h—rate. This is calculated by PHPP in the Ventilation tab based on data about floor space, occupancy rates and number of kitchens and bathrooms. This is the commissioning target.
#2 Communicate the commissioning process and targets very clearly
It’s the Passive House designer’s responsibility to communicate the commissioning targets very clearly, in writing, to the person charged with commissioning the MVHR.
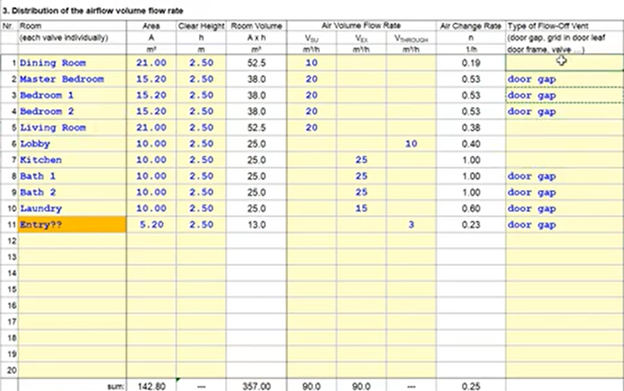
Use the official PHI “Final Protocol Worksheet” (PHPP_EN_Vxx_Final_Protocol_Worksheets_Ventilation.xlsx) from the Passive House Institute. Fill out the “Design” tab with the project details and the specific target airflow for every vent. (The certifiers check this detail at the pre-construction review, so if we see anything odd, we’ll be in touch.) This worksheet should be provided to the person commissioning the system.
The MVHR supplier typically provides room-by-room calculations as part of their quotation. When requesting their quote, ask that they use the average flow rate value as the basis of their calculations. Ventilation suppliers and installers in New Zealand do most of their work in commercial buildings. In that case, they commission systems at the maximum flow rate: that’s just how the systems are designed to work.
Our firm’s practice when we act as Passive House designers, is to provide a construction guide, which includes a page for the installer with directions on what to do. We also ask them to call the PH designer before they begin commissioning (so we can check they have read the instructions)!
#3 Understand who does what—and don’t hesitate to ask for help
This is applicable for everyone: the designer, the architect, the construction team. We all need to be communicating clearly about requirements. There is not yet widespread expertise in installing and commissioning balanced ventilation systems in residential buildings in New Zealand. Particularly if a project is outside a main centre, it may not be possible to hire someone who’s done it before and likely the work will be done by an electrician, hopefully with some HVAC experience. The ductwork is a crucial part of the system and may be run by a specialist or by the building team. The installation and commissioning of the unit may be done by a single person—or an electrician may wire it in, a plumber install the condensate drain and a third person come in to commission it.
On most residential builds in New Zealand, the builder is very likely also project managing the job and he or she may be co-ordinating and instructing all these different trades. As Sara Wareing emphasised in this article, lean on the MVHR supplier for information and guidance. They have a great deal of expertise. One supplier, Wolf, always installs any unit they supply. Others will provide support or step in to assist when necessary.
What mistakes do you want to avoid here? Well, on one project where we acted as Passive House designers, we specified the MVHR system and provided clear commissioning instructions. That didn’t stop an entirely different ventilation system being installed, with poor quality ductwork! The problems here went much further back than just errors in commissioning. It’s a Passive House fundamental: the lead contractor must not vary any specifications without written approval from the architect/designers.
In another situation, the commissioning agent multiplied the airflow by x3.6 and provided us with a commissioning document showing an airflow rate far in excess of what the unit was physically capable of supplying. The mistake arose because it is usual to quote airflow rates in L/sec in New Zealand but PHI uses m3/hour.
#4 Understand what commissioning is
Turning the unit on is not commissioning. Don’t laugh, we are aware of situations where the technician did not understand this fundamental distinction. First, they need to set the MVHR unit to hit the target average air flow rate. Using a calibrated flow hood, they’ll next measure the airflow at each vent, tweaking them until they match the room rate flows indicated in the design (internal doors must be closed, to confirm door undercuts are functioning as intended).
The system is considered balanced when the volumes of incoming and outgoing air are within 10%. All measurements should be logged on the sheet called “Initial Startup” in the “PHPP_EN_Vxx_Final_Protocol_Worksheets_Ventilation.xlsx” Excel file. The total supply and exhaust for the whole building should also be documented. If there is a valid reason why they can’t do this, we as certifiers want to see a note on the worksheet explaining why (eg no access to the duct vent because it’s on a roof). Noise levels should be measured in living rooms and recorded, along with confirmation that the correct grade filters are installed.
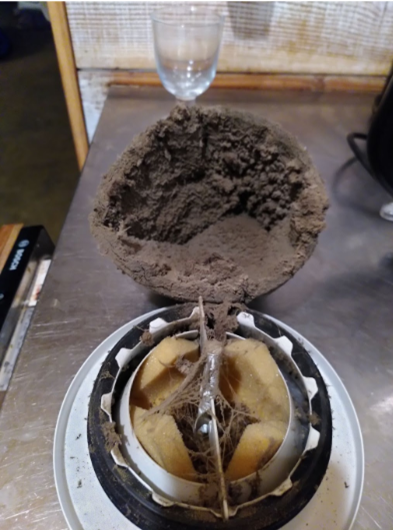
Why do we want that confirmed? Because a while back Jason Quinn visited an occupied Passive House home where the filters were still sitting in their box on top of the MVHR unit. The supplier had supplied them but the installer didn’t fit them and the commissioning agent hadn’t noticed or didn’t think it was important. Occupants need to understand the importance of cleaning and replacing the filters, both at the unit and the extract terminals: they should never get this bad!
A final caution
The stakes are even higher on a “high-performance home” or a project for which certification is not being sought. There’s no independent oversight picking up mistakes or lapses and that can be costly. We once carried out Passive House design for a homeowner who decided he trusted his builder and didn’t need to certify. We had no further involvement until receiving a call a year or so after he’d moved in. He complained the house was uncomfortably cold and his power bills were much higher than he expected.
On investigation, it turned out the MVHR was never commissioned. There was virtually zero air being extracted from the bathroom and so the occupants were opening the bathroom window to allow steam to escape. This came with a significant thermal penalty in winter, significantly increasing heating demand. Once the ventilation system was operating correctly, the house performed beautifully.
More reading
- Why never to use flex duct and schedules for changing/cleaning filters:
Don’t overlook these three things when specifying MVHR systems - For more details about filters and noise measurements, see these 2019 notes by Jason Quinn:
MVHR commissioning in Certified Passive House Buildings (includes PHI Low Energy Building Standard and EnerPHit as well) - This article by Sara Wareing has some excellent details about designing and installing to minimise noise:
Collaboration and planning make for good MVHR acoustic performance
All information published by Sustainable Engineering about MVHRs: Index