
Passive House Primer
Advice for designing your first higher-performance homes
This invaluable guide is aimed at architects and designers who want to start creating buildings that perform better than the Building Code minimum—all the way up to certified Passive House performance.
Packed full of useful advice, the Passive House Primer will help you neatly sidestep common pitfalls encountered when beginning on this path.
It’s produced by the New Zealand Passive House certifiers at Sustainable Engineering Limited. Our team reviews virtually every certified Passive House or Low Energy Building in New Zealand, which gives us unparalleled perspective on what works … and what doesn’t.
Free, but priceless:
Read the Passive House Primer online below
So you—or your client—are set on creating something better than a Code-minimum home? Great! However, it’s not as simple as adding more insulation. Or just ordering expensive windows.
We’re the Passive House certifiers in New Zealand. We’re building scientists, not designers or architects, and we’re independent. We’re not trying to sell you components or any materials. Instead this guide shares our best advice to help as you begin to design buildings that are warmer, drier and more efficient than the bare legal minimum of the
Building Code.
As certifiers and consultants, we see a lot of projects. It gives us a unique perspective on what works, what doesn’t work and the mistakes people often make as they begin designing better performing buildings.
We’ll link you to more information and resources on our website, to help build your knowledge and confidence so you can avoid the common traps and pitfalls. You can use the information in this guide to design to Passive House standards1 or a more modest improvement on Code-minimums. It’s relevant to homes and other building types. Passive House is the gold standard of amazingly energy-efficient buildings that create wonderfully comfortable and healthy indoor environments. They help save the planet too, by slashing operational carbon over the entire lifetime of a building (and that’s a long lifetime, because what makes a Passive House efficient and comfortable also produces a quality, durable building).
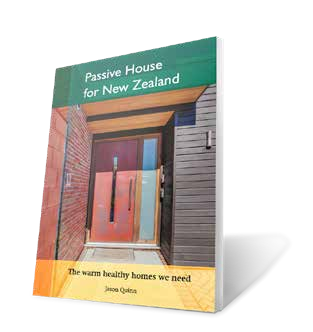
The book written by our founding director, Passive House for New Zealand, is available to read online. That’s a good place to start to understand why Passive House levels of performance are totally appropriate for New Zealand and to learn about all the benefits—for homeowners, communities and the climate.
PASSIVE HOUSE IS A SYSTEM
Passive House is unfortunately often reduced to a checklist that focuses on components and overlooks the design stage energy modelling that is completely integral to Passive House design.

1 PHI is the Passive House Institute. As well as the Passive House standard, there are Passive House Plus and Premium certifications, which acknowledge different stages of net-zero buildings, and Low Energy Building certification, which you could say is Passive House-lite. There is a specific certification for retrofitted buildings, called EnerPHit.
Ill-informed designers or developers get into a power of trouble when they think they can sprinkle “Passive House principles” over a project and produce something wonderful. Instead they are almost certainly wasting clients’ money, risk profoundly disappointing them and sometimes create so much overheating that the house is uninhabitable in summer. Quietly, we expect to see lawsuits.
Please go and read That’s enough cargo-cult architecture so you understand what a very bad idea it is to cherry-pick higher performing components. Your clients may have been told by other designers or developers that design-stage energy modelling is a waste of money, Passive House certification is unnecessary and that they can have a “high-performance home” instead for much less. It’s vital you can calmly and accurately refute misleading information.
Remember too, it’s not a Passive House unless it’s a certified Passive House. That means hard, real-world data and evidence, reviewed and tested by independent third parties (especially qualified certifiers, like us).
This guide includes advice about each of these Passive House principles but goes beyond them too. Keep reading.
LEARN THE RULES THEN BREAK THEM
Passive House is a performance standard not a set of design criteria. It is very good at the specific
things it focuses on, primarily extremely energy-efficient, thermally comfortable, quality buildings. The standard doesn’t tell you what to build with or how it should look. It gives you a target to reach and an objective, independent way to establish that you have succeeded in reaching that target.

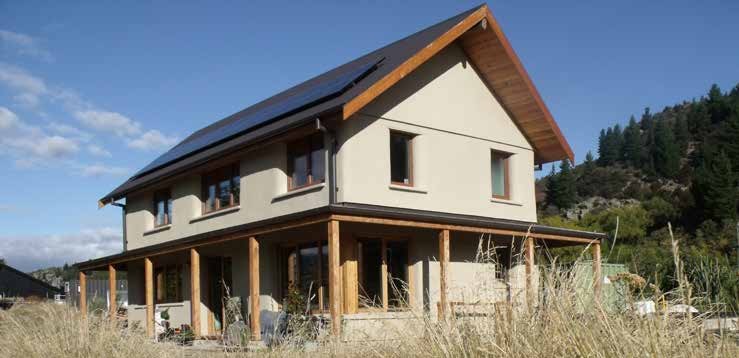
St Leonard’s Passive House (views to the east and south). Architect: Architype Ltd
Every client and every site is different. The flexibility of Passive House is one of its strengths. Your design must respond to the site, its surroundings and the climate, as well as your clients’ requirements. Trade-offs can be made, principles can be stretched. The client wants expansive glazing to the south because of the expensive views or the privacy? Trade that off against increased insulation.
The client wants a peaceful haven but their site is under a flight path and next to a railway line? Go to triple-glazed windows.
The client’s budget is tight? Simplify the form factor to improve energy efficiency and reduce construction costs.
You must know the rules in order to get away with breaking them. It’s like playing jazz. You have to know your scales by heart before you can start improvising.
THINK PASSIVE (WITH A CAPITAL P) FROM THE BEGINNING
Retrofitting an existing design to try to meet the Passive House standard will almost certainly cost more than designing with Passive House in mind at the outset.

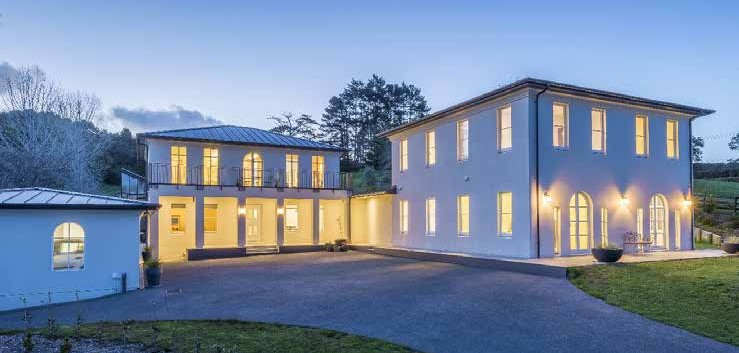
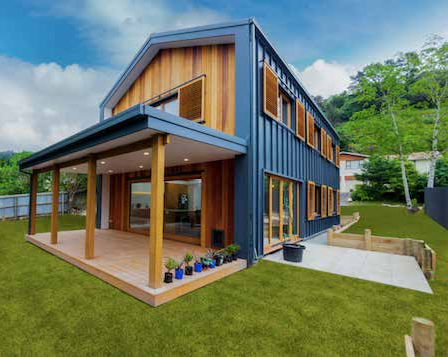
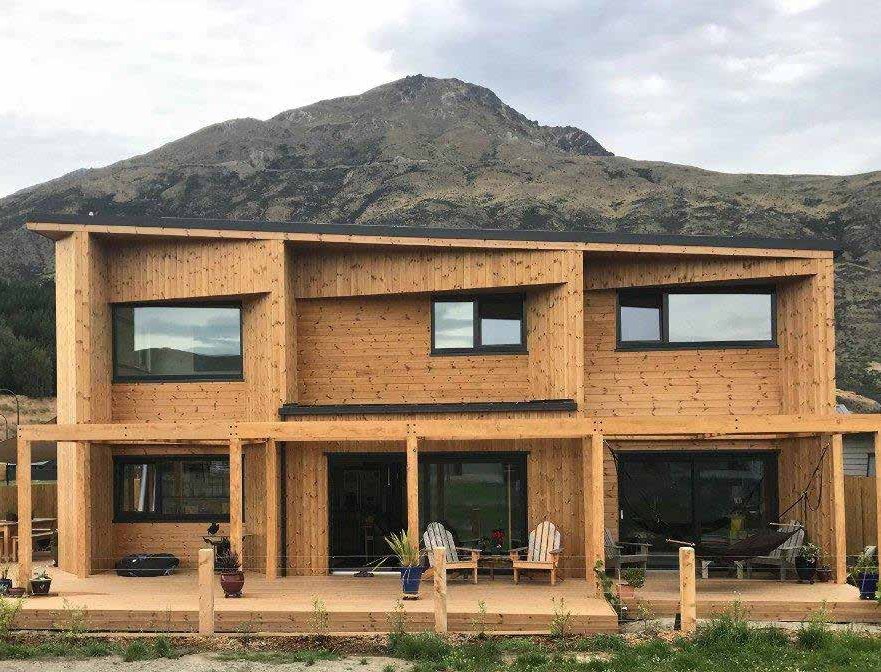
The award-winning George House overlooks Wanaka. It’s cold there, it drops to -10C. There’s considerable window area. And it’s a certified Passive House building. It’s all possible. Architect: Rafe Maclean Architects.
It is possible to work backwards and a number of New Zealand’s early Passive House projects did that. But it’s less than ideal to be forced to use expensive components to compensate for ill-considered choices at design stage.
And retrofititng a design can get tricky. We’ve reviewed projects where the design, once insulated sufficiently to meet heating demand targets, would produce a house hotter than 25 degrees for the entire summer.
Can you make little cabins connected by glass hallways in a cold climate like Queenstown perform to Passive House standards? Yes … if budget isn’t a concern. Building Code calls for wall insulation of R2.3. Taking those little cabins to R13.0 and using quad-paned glass might get the project over the line, but it’s going to cost. Intelligent design is located in its environmental context and doesn’t pick unwinnable arguments with climatic constraints. (We believe that low embodied and operational energy requirements must take priority over unconstrained design ambition, given the threat of climate change disaster.)
CLIMATE

The climate zones are based on extensive NIWA analysis.
The Building Code has criteria that apply to every project, no matter where in New Zealand it is. But climate and altitude have a big impact on how warm and comfortable a building will be; that’s why PHI has 19 different climate zones for New Zealand and it’s adjusted for a site’s height high above sea level.
It’s much easier and less expensive to get to Passive House performance levels in Auckland compared to
somewhere up a mountain near Queenstown. The milder the climate, the less compromises and less budget is needed. In a colder climate, unless the budget is huge, it becomes more important to do well on a number of different factors. Think, lower form factor and thicker constructions and smaller windows and good airtightness.
Climate also defines the mould indication criteria (fRSI) the building must meet. As certifiers, we check the risky places in the building envelope where cold surfaces could lead to mould growth: window frames, door sills, slab edges etc. Climate should strongly influence your shortlist for window joinery options. It also underpins how easy it is to include complicating features like wing walls or balconies.
SITE SELECTION
Passive House uses solar gain when it’s useful but doesn’t depend on it. Be crystal clear about the differences between Passive House and passive solar, so your clients understand also. Getting to the Passive House standard does not require a section perfectly oriented to the north. Just as well, as that’s hard to find especially as more urban in-fill development happens. Sloping sections, heavy shading from neighbours, structures or topography, council requirements for setbacks: these are not impossible obstacles. The more constraints you have, the smarter you need to be—from the beginning.
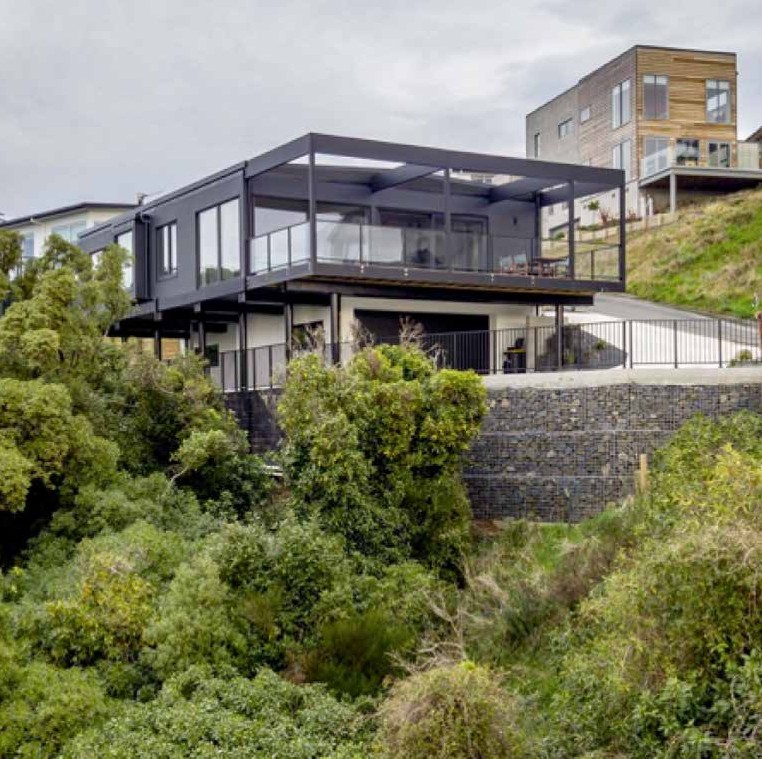
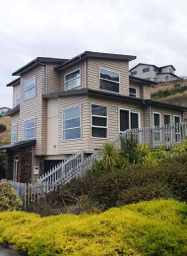
To inspire you, consider the challenges overcome on the Weekly residence project in Dunedin: cold climate, views to the south (but only from the top of the steep site), protected bush,
a road and a shade- throwing neighbour on the northern boundary. Oh, and a client brief that specified lots
of carparking. The architects rose to the occasion and created something beautiful that worked read the case study to find out how they did it. Design: Architype Ltd.
FORM FACTOR
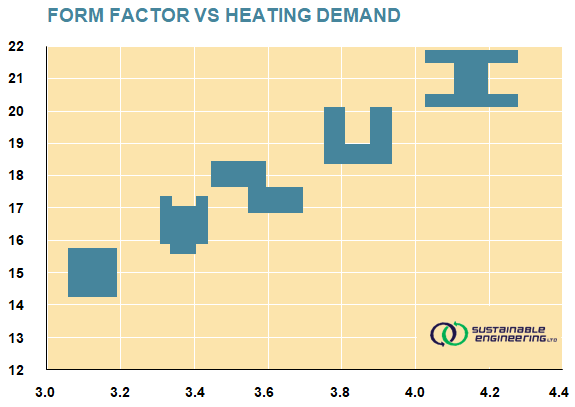
Form factor is a ratio of useable floor area to the thermal envelope area. A smaller form factor means less surface area losing heat for the same amount of internal floor area. More corners mean more thermal bridging to be managed and more insulation to compensate. (Ironically, we’re doing the hardest projects first in New Zealand. Apartment blocks or even semi-detached housing are easier and cheaper to design to Passive House performance levels compared to stand-alone single-family homes).

Heathmont in Australia combines inspired design and impressive functionality. The complex shape (and resultant high form factor) was no barrier to Passive House certification. Architect: Maxa Design
In New Zealand, most houses achieve Passive House certification based on heating demand, which is measured per metre squared. Reducing form factor reduces heating demand. The lower the form factor, the less insulation required to get your project across the line.
Form factor effects the project in other ways. As a general rule of thumb, a lower form factor number will be simpler and thus cheaper to construct. Useful to remember when budget is tight.
CONSTRUCTION SYSTEMS
Given that discussion about form factor, a single-family Passive House home generally requires significantly thicker assemblies compared to one that only just meets the Building Code. Passive House requirements can be met with almost any assembly: timber- framed, SIP, ICF, even straw bale Passive House homes have been successfully built in New Zealand.
When sketching concept designs for single- family homes, make your walls, roof and floor assemblies thicker. In the case of timber- framing, this provides the greater depth needed for installing thicker insulation. While 140+45mm is a good starting point in most of the country, a shady site, the coldest climates or high form factor can require 140+90mm or even 190+90mm wall assemblies. Larger projects like apartment buildings can most likely use conventional thicknesses, or only marginally thicker.
Everyone knows Passive House buildings are very thoroughly insulated; there’s not much we need to say here. Verifying your insulation specs are correct is the real goal of design- stage thermal modelling.
HOT TIP:Make sure your client gets their money’s worth out of the high-spec insulation. Insulation is only as good as the person who installs it. Gaps between batts can halve the performance of the wall.
Thermal bypass (the wind getting under the insulation) is even worse than gaps. Mostly it’s a risk around the edge of the ceiling but it can occur in walls as well.
The best installations are tidy: the insulation product has been sized perfectly for the space available. Contractors might be tempted to use offcuts to save money
but it’s false economy. The homeowner will pay extra on their heating bills for the rest of the building’s life. Make sure the project manager or clerk of works is closely monitoring insulation installation.
Straw bale certified Passive House, New Zealand’s first (Hiberna Strawbale House).
Timber-framed certified Passive House (Mt Pleasant House).
ICF (insulated concrete forms) were used in some early New Zealand Passive House projects but are less common now as designers and clients become more sensitive to embodied carbon (Coatesville eHaus).
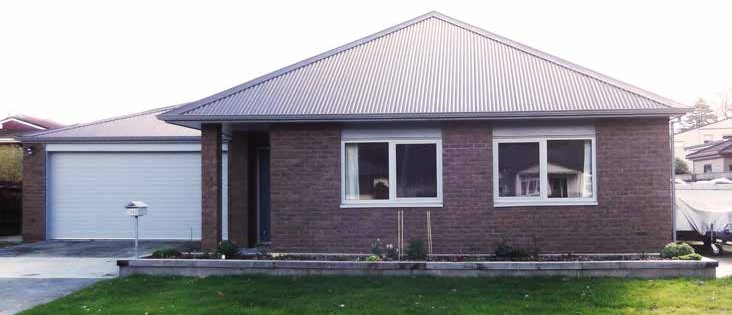
And if your client really wants a brick house indistinguishable from the neighbours in a new subdivision, that is also possible (Hohaia House (certified Low Energy Building))
WINDOW PLACEMENT
Passive House-quality windows are testament to the glory of engineering. They are hi-tech and high-quality. They have to be, because glazing is the insulative weak leak. Even the best certified Passive House windows conduct more heat than the wall assemblies they sit in. (Interestingly, the glass is so good—even just double-glazed, with low-E glass, a warm edge spacer and argon fill—it has better thermal performance than the window frames.)
Take a look at any group home builder’s catalogue and you’ll see large glazing areas made up of multiple frames. It creates a particular kind of look, but you’re hopefully unlikely to be designing a poor facsimile of a heritage home. Instead, keep it simple (which is also modern and appealing).
Remember the point above: window frames have lower R-values than the glass inside them. They’re also expensive so don’t create more frame without very good reason.
The larger the window area, the more they cost the project. There’s the
cost of the glazing and the frames but also knock-on costs, like potentially needing higher levels of insulation in the assemblies to compensate.
Evaluate windows with regard to offering views and harvesting daylight. Windows below waist height don’t do a lot for either. Think of windows as picture frames not walls. It’s common for Passive House builds to minimise glazing on the southern wall (because of heat loss) and often on the west (to protect from overheating late afternoon sun in summer) but bigger budgets offer more flexibility.
High-performance window frames are typically quite a bit wider than solid metal frames. To get a glass pane the same size as you would have with metal frames, the window area needs to be made larger.
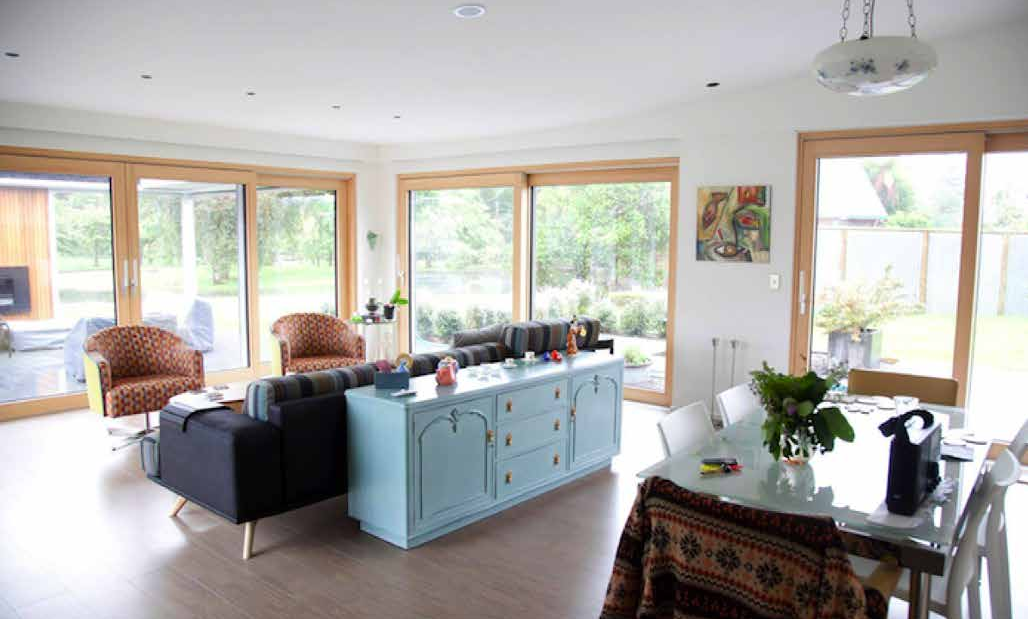
The Waikanae Passive House shows what can be done when the architect knows the rules very well—and isn’t afraid to break them. Lots of glazing. Lots of clever responses to prevent overheating. (Lots of budget, too.) Architect: Energy Architecture NZ Ltd.
SHADING
Shade needs to be taken into account at the earliest concept design stage. There’s good shade and bad shade and both need to be taken into account.
There’s the obvious shade that already exists, from neighbouring structures, topography or trees. There’s also shade that you can add into your design and energy models, such as pergolas, eaves, verandahs and external shutters or blinds.
You have to think differently about shading as a Passive House designer. A Passive House is a super-insulated container and without careful management, lots of glass in particular places can turn that containers into a solar-powered oven. (Remember your cooling load and demand numbers need to stay under the Passive House maximums, not just heating.)
If your project has a tight budget, be very considered about the size and placement of the windows or glazed doors.
If there’s lots of glass, then use shading to prevent overheating in summer. There are a few different strategies available. Eaves and overhangs are very effective on north- facing orientations. Size and position these so that summer sun is excluded but winter
sun is welcomed deep into the building. Once more than 45 degrees off north, eaves and
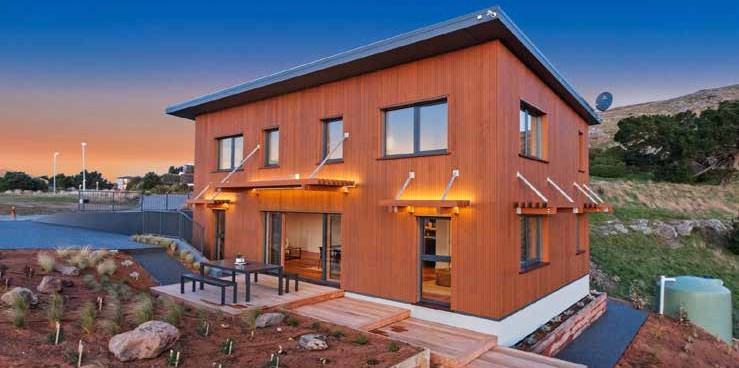
A deep verandah
reduces summer sun
through the large
east-facing sliding
doors. External sliding
louvre shutters are
put to use during
summer, preventing
overheating but still
allowing filtered light
and views. Architect:
THECA Architecture.
overhangs stop being so effective. On the east and west sides, either small windows or operable shading are the best options. External blinds can be motorised and automated.
Finally if an enormous area of glazing with no shading is non-negotiable, special low solar heat gain glass is available. (This is different from low-E glazing, despite the similar names). The catch is it dramatically reduces the amount of heat entering the building,
in winter and summer: no solar oven, but higher winter heating requirements. This is arguably best used in warmer climate zones. In cold areas, the trade-off is even more insulation. The glass also has a bit of a tint, so it’s a good idea to specify this glass in all the windows in a room.
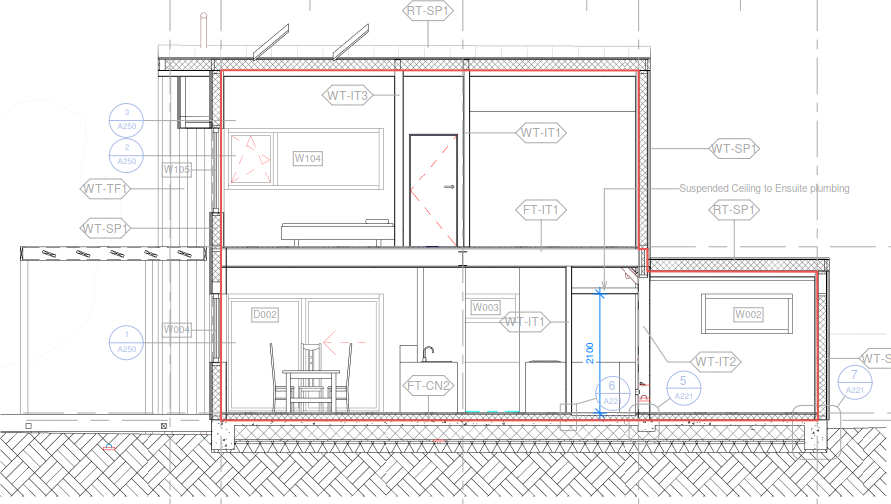
SERVICE CAVITIES
Service cavities are the usual way to meet ventilation and airtightness requirements. The service cavity exists between the airtight layer and the finished internal wall and is typically insulated. Into this cavity go cables, plumbing pipes, ventilation ducts and other building services. Service cavities can be for ceilings as well as walls: anywhere you might want to run a duct, pipe or cable. Adding a service cavity usually results in multiple layers of insulation as well as reducing the interruptions in the insulation continuity, which increases thermal performance.

Think about the ceiling early. Both a truss roof and skillion roof need a service cavity inside the air control layer. It needs to be 35-140mm thick, depending on what services run inside it and whether everything needs to be flush with the ceiling plane.
- If ducts are required, 140mm can accommodate the height of the fitting where the MVHR terminal exits into the
- Recessed downlights need a minimum height of 55mm—check the specific models).
- If only electrical cabling is needed in the service cavity, it could be as little as 35mm
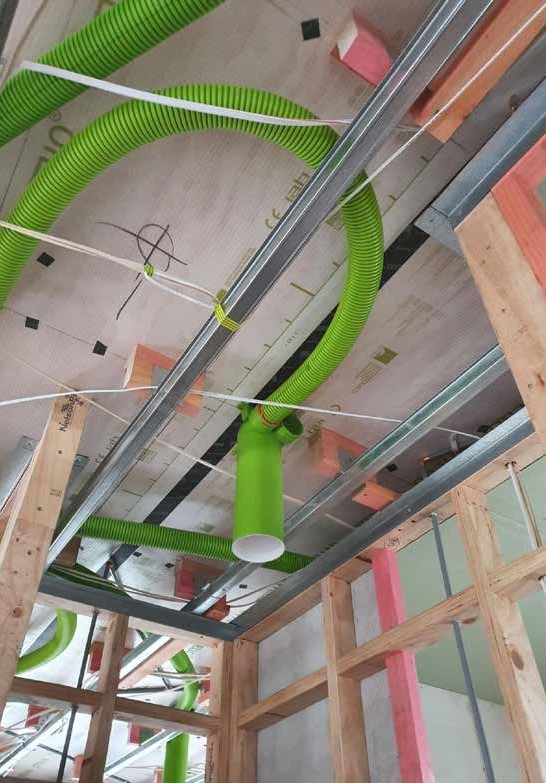 This ceiling service cavity neatly contains wiring,
plumbing, MVHR ducting and the MVHR terminal (outlet
to the room).
HOT TIPS: Good questions to ponder at
design stage:
• Where do the services run to and from?
• Do different services need to cross over
each other?
• What direction do the battens run
compared to the services? Parallel is
nice and easy. If perpendicular, consider
some blocking so services don’t need to
penetrate every batten.
design stage:
• Where do the services run to and from?
• Do different services need to cross over
each other?
• What direction do the battens run
compared to the services? Parallel is
nice and easy. If perpendicular, consider
some blocking so services don’t need to
penetrate every batten.
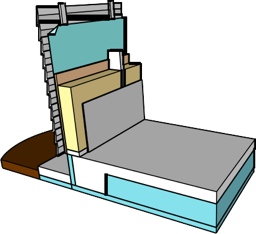
3D illustration of
a timber-framed
house with ceiling
service cavity and
insulated wall
service cavity.
It’s really important to allow for service cavities during concept design. It’s hard to find an extra 140mm when your design is complete—but you can always take it out and have a slightly higher ceiling. Running services will take a lot longer on site if the design hasn’t provided sufficient space.
Of course if your client is going for an industrial aesthetic and the design makes a feature of exposed ducting and hanging lights with a conduit and cable trays, you don’t need a service cavity!
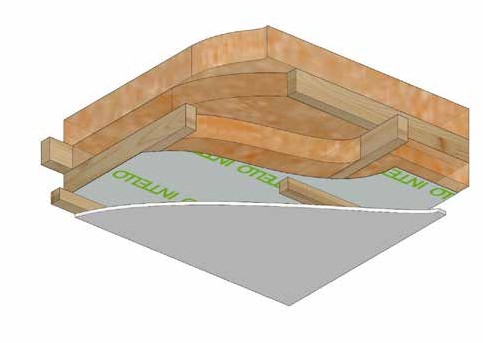 3D illustration of a shallow ceiling service
cavity (note battens creating the cavity
between the plasterboard and the AVCL).
THERMAL BRIDGES
There are two kinds of thermal bridges. The most obvious one happens when a conductive material penetrates the insulation. It might be a timber stud and batts or a steel beam running through the wall and out into the garage.
Timber doesn’t conduct heat very well. So while it does reduce the performance of your assembly a bit, it will always be present and can be managed. Still, less is more.
Steel is really conductive (that’s why saucepans are made from steel!). Steel running from inside to outside the insulation is bad news. The thermal bridge creates lots of heat loss and brings a cold element inside, risking condensation or mould.
Steel necessary for structural reasons? Well, first ask the structural engineer if engineered timber beams are an option. That would mean lower embodied carbon on the project, minimal thermal bridging and less expensive engineering time spent by the certifiers to calculate just how bad the steel thermal bridge is.
If it must be steel, either put it entirely inside or entirely outside the thermal envelope. (Remember the garage in a Passive House home is outside the envelope).
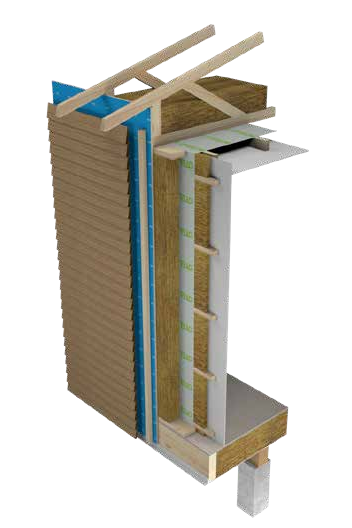
Skillion ceiling with insulation in between
the timber rafters, which are a thermal
bridge. Steel rafters would have a much
worse effect on performance.Where the slab meets the wall is an example of a geometric thermal bridge. Here the heat loss is substantially reduced by well-designed insulation of the slab edge and skirt insulation (shown in light blue)
Geometric thermal bridges aren’t as obvious but also need your attention. These occur at every junction: for instance, a slab edge, the corner of a wall, midfloor, eave or ridge. These thermal bridges are generally unavoidable, but the fewer a building has, the better its performance and the less analysis required. It comes back to the earlier points about form factor and how fewer corners make for a more efficient building.
All of these geometric thermal bridges will need special attention in detailed design. The fewer thermal bridges, the easier and cheaper it is to design and, especially, to build.
Fortunately, the High-Performance Construction Details Handbook is chock-full of details you can consult, learn from and copy.
AIRTIGHTNESS
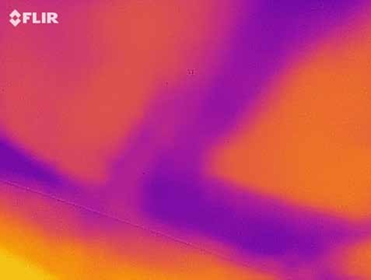
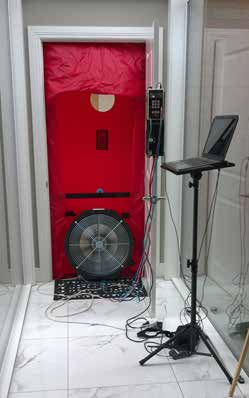
For a building to meet the Passive House standards it must have fewer than 0.6 air changes per hour when the building is pressurised to 50 pascals. That is a very precise upper limit that is objectively and accurately measured by a blower door test (see photo right) at key construction stages. It keeps designers and builders alike very focused on their responsibilities. You have
a very serious responsibility to the project:
design a good airtightness layer and specify the details so that it can be built as designed. (Read why It’s unfair to blame the builders if it hasn’t been designed properly.)
Conventional building practices won’t produce an airtight building. A specific layer in the building envelope is needed to do this job. Hi-tech building membranes are often used but plywood or the face of a SIP panel are other options.
The airtightness layer must be continuous and this means in practice, tape or glue at every single junction. Complicated junctions, holes for services, changes in structure all make airtight construction harder and increase labour time and costs on site. Good design minimises or avoids all of these problems.
We like the analogy of wrapping a Christmas present. Nice square boxes are really easy to wrap, only a few corners to tidily deal with. But when the shape gets complicated, it’s
harder to wrap and more tape is required at the joins. A Passive House building is wrapped up in the air and vapour control layer (AVCL) and the edges sealed with what is essentially the best ever sellotape. Complicated shapes need more wrap and more tape and a lot more time and effort.
You might put awkward-shaped Christmas presents inside a box that is then easily wrapped. The opposite strategy is a winner when it comes to Passive Houses: put the complicated shape outside the box. In this case, outside the thermal envelope. Outside-the-envelope options include rainscreens, articulated shading, conservatories, wintergardens, pergolas etc.
Here’s an illustration to make the point clearer. Meet the Shotover Passive House:
That looks like a very hard present to wrap, right? Wrong. Despite it’s striking appearance, the upper floor of this building is a relatively simple shape. Most of the detailing is outside the thermal envelope.
Design as few penetrations of the air vapour control layer as possible. Avoid plumbing stack vents, dryer vents and other service penetrations if at all possible! Any penetration of the air control layer must be carefully sealed. A good Passive House contractor will appoint an airtightness champion on their team and ensure that sub-trades are crystal clear about their responsibilities as they go about running pipes and cables. Careless punctures of the air vapour control layer will make the building fail the blower door test.
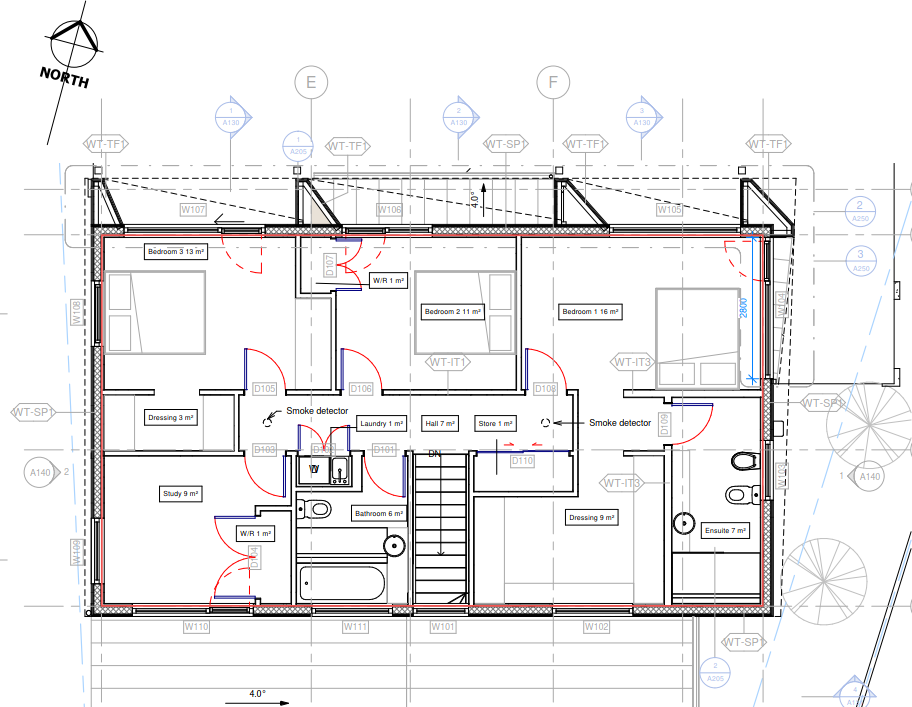
Drawings: Energy Architecture NZ Ltd (annotated by Sustainable Engineering Ltd)
HOT TIP: How easy will it be to make your house airtight? Take a red pen and draw a line along the air vapour control layer in each of your sections. If that line is not continuous, you’ve found likely sites of air leakage and difficulty on site, right at the places where you had to lift your pen. If the red line steps back and forward repeatedly, that’s going to be hard too.
MVHR units aren’t large. In a single-family home, they are often located in a cupboard in the laundry. In apartments, an MVHR unit might fit in a kitchen cupboard
VENTILATION
Humans need fresh air. We need to design buildings where the air is always fresh. That’s even more essential when we design Passive House buildings. Sufficient ventilation is
one of the objective targets that must be met in order to gain certification. (Remember, Passive Houses are not 100% airtight: that’s what the ACH/hr measure is quantifying. But they are airtight enough to make ventilation essential. Relying on occupants to open windows regularly is woefully inadequate
in even Code-minimum homes, in our view. It certainly doesn’t cut it in a Low Energy Building or Passive House.)
Specifying mechanical ventilation is the easiest way to meet the ventilation requirement in a certified Passive House. Units with heat recovery (MVHR) are highly recommended. These swap energy in the form of heat between incoming and outgoing air, reducing heating or cooling demand and avoiding draughts.
MVHRs continuously extract damp, stale or odorous air from the kitchen, bathroom and utility areas and supply filtered, fresh air to the living areas, including bedrooms. As with a commercial building, the duct runs need to be thought about in advance (hullo service cavities). A duct from each vent runs back to a splitter box and from there to the
MVHR unit. All of this requires space. Minimise MVHR costs by designing an efficient duct layout—and do it at detailed design stage after having made provision for this space at the concept stage. Trying to find space in a finished design is not going to go well.
The most efficient location for the MVHR unit is inside the house. If it’s outside, it would require its own insulated box. Remember it needs to be regularly accessed to clean or change the filters; don’t make that difficult. Think well ahead to the end of the unit’s life and ensure it can be removed without having to demo a wall.
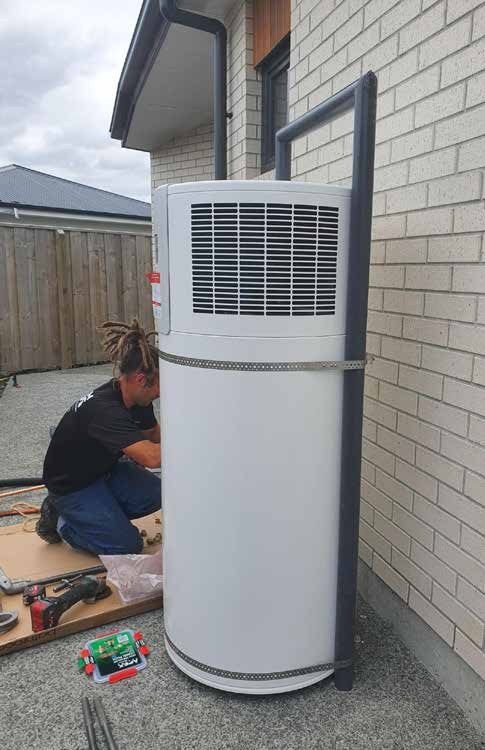
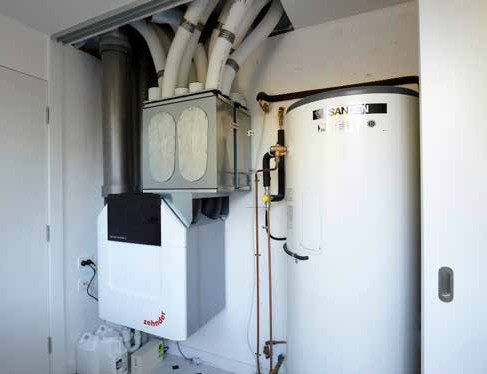
HOT WATER
Now that space heating costs have been slashed, it’s time to put hot water under the spotlight of rigorous enquiry. We recommend hot water heat pumps because they are so much more efficient than electric resistance hot water heating. (Hot water heat pumps
are worth specifying on any build, not just Passive House projects, because they have the potential to cut hot water heating costs by two-thirds. The catch of course is a higher capital cost, but the payback period is less than five years).
All-in-one heat pump and hot water cylinders are available that can go outside the house
or in the garage, thanks to a really well- insulated tank. It could be located inside, but the pump is a bit noisy and it requires good airflow. Alternatively, the heat pump can be sited outside and connected to a hot water cylinder inside the house.
Either way, consider how to locate the hot water cylinder in the closest possible proximity to the taps. The shorter the pipe run, the more efficient. Any pipes and fittings located outside must be very well insulated. Even then, they will lose more heat than the cylinder.
A conventional electric hot water cylinder is not a barrier to reaching Passive House certification, but hot water heat pumps have such a good payback period that it makes sense to look at these first.
Using natural gas to heat hot water however is tricky and may prevent certification because of the carbon cost. We have certified several projects that managed to get over the line
with gas hot water, but other projects were forced to retrofit to an electric system. It’s a bad environmental choice, more expensive and jeopardises certification. If your client is adamant (for example, their home is off-grid), make sure hot water storage is properly sized and include a boost element just in case.
COOKING
Cooking produces steam and smells and both need to be extracted from a Passive House home. We most commonly recommend recirculating rangehoods, which have activated charcoal filters to collect grease and particulates from cooking, along with an induction cooktop.
Other options are more problematic. Conventional rangehoods or kitchen extract fans in Passive House buildings aren’t easy because the fans are often very high-powered. (Purchasers assume bigger numbers equals better performance, which isn’t always the case). A high flow rate will move many more air changes than a mechanical ventilation system and all the incoming replacement air has to be heated when it’s cold outside (the
reverse is true in summer). This bumps up the house’s heating demand. Plus that hole in the wall is hard to airtight perfectly and it will add to overall air leakage.
What if you have a client who wants a gas cooktop? Firstly, we implore you to educate them as to what a terrible idea this is. Gas appliances produce harmful air pollution and increase humidity. That’s not good and is awkward paired with a recirculating hood. We do not recommend this. However, a gas cooktop will not automatically fail Passive House certification. Commissioning the boost on the MHVR a bit higher than is typical for a Passive House should also meet Building Code ventilation requirements.
What about a client who is a chef and whose cooking habits demand real extraction? An extract hood can be feasible, but make sure there’s plenty of margin for heating demand. It’s easier in a warmer climate.
REPEAT WHAT WORKS
Increasing numbers of New Zealanders are designing and constructing buildings that perform far better than the Building Code minimum. Learn from them, find out what worked and what they would change. You don’t have to reinvent the wheel.
- Join Te Tōpūtanga o te Whare Korou ki Aotearoa, Passive House Institute NZ (PHINZ) and attend its events. The chance to talk with other professionals over lunch or a drink is as valuable as the
- Subscribe to the Sustainable Engineering newsletter: one email a month with valuable, original content written by our team. The technical article is exclusive to subscribers. Encourage your clients to sign up to the homeowners’ version of our
- We have contributed a great deal of time to a handbook of high-performance construction details, published by PHINZ and funded by the Building Research Publication is imminent and will be announced through PHINZ and Sustainable Engineering channels. This handbook will be an extremely valuable resource as it puts high-performance details (from successfully built and certified New Zealand projects) into the public domain.
- There are extensive resources published online by PHI at Passipedia.
- Passive House + publishes a magazine and a lot of digital content—mostly focused on the UK but with some international
WAYS WE CAN HELP
Taking into account the above advice does not necessarily mean that you will have a Passive House. Think of this list as ingredients: they can be mixed together in different ways and at different ratios to make different meals.
Architects and designers can either do training offered by PHINZ and become certified Passive House designers, or bring in a certified professional to do the design stage energy modelling, provide advice and design details if necessary. You can find a list of certified professionals on the PHINZ website.
Sustainable Engineering can provide Passive House design, but the project would then need to use an overseas certifier (certification is an independent third-party review so we can’t certify our own designs).
We can assist with some quick modelling at the early concept stage, what we’ve dubbed a ‘shoebox model’. All we need to do this is a sketch or a floor plan, details about the site and an estimate of the glazing (either as an area or a percentage). We can then provide details about what constructions are required to meet different levels of thermal performance. We talk through the project, going over what you want to achieve, the Passive House principles to keep foremost in mind and any easy wins or large risks that are apparent. It’s a lowcost, fixed-price service, designed to give you exactly the information you need at the very beginning of the project.
Initial Design is a popular service we offer that assists once the concept design is complete. We use your plans, sections, elevations, site plan and site photos to make a detailed 3D thermal model as a basis for specifying the glazing and insulation needed to meet your performance goals.
Further, Sustainable Engineering has some resources to assist once you begin the Passive House certification process. Certification is not something tacked on to the end of the building process! The first step, and most important, is pre-construction review. As the name suggests, it needs to happen before work starts on site. We recommend it gets underway before consent applications are lodged, in case redesign is required to reach the performance targets.
CONTACT US:
sustainableengineering.co.nz
info@sustainableengineering.co.nz
Jason Quinn
Director
021 1846 911