A long time ago, I worked on renovations of a mostly concrete building (concrete walls and mid-floors with a timber roof). The new owner of the building wanted an energy efficient building; warm healthy and dry was the goal. I went on a site visit, and the current condition was horrible. You could literally see the cold thermal bridges from the visible mould. For example, in the photo below, the connection of the concrete mid-floor to the exterior walls had visible mould on the ceiling near the edge of the building in most of the rooms.

The initial plan for the building retrofit was to batten out the exterior walls on the inside with fibreglass insulation. As we explained, using fiberglass insulation on the inside of concrete walls can cause moisture issues. Even assuming we found a moisture-safe solution, we also had the issue that the mid-floor and the interior walls joined with the exterior walls, making the length of each of these a thermal bridge.
It doesn’t really take condensation on a surface to grow mould. You just need high relative humidity, which easily happens at colder spots in a room. Always remember the maxim: cold spots equal mould spots. If a surface is colder than the room, the air right at the surface is colder and thus has high relative humidity. The nice, warm & dry air inside a typical NZ home in the winter is 20°C and 60% relative humidity (RH). If the window sill is 15°C, then the window sill surface relative humidity is slightly above 80%, which is definitely high enough for potential mould growth. To really calculate whether or not you will get mould growth is a bit more complicated, because it involves the materials, the amount of time at high relative humidity as well as moisture storage of the surface. But in general, if you just avoid cold spots, you can avoid mould spots from interior moisture.
State-of-the-art in assessing building assembly moisture durability and resistance to mould growth is to simulate the heat and moisture transfer over time, called hygrothermal modelling, using software like WUFI. Then evaluating the results using ANSI/ASHRAE Standard 160-2016, ‘Criteria for Moisture-Control Design Analysis in Buildings’ which specifies criteria for predicting/mitigating/reducing moisture damage to the building envelope depending on climate, construction type, and HVAC system operation. Alternate approaches to using WUFI and ASHRAE 160, like surface temperature comparison, are more conservative for the interior surface, and not as accurate. Sometimes a more conservative and hell of a lot more cost effective approach is where you should start.
Our practice is to first use the Passive House Institute’s frsi moisture criteria, which only requires thermal modelling using Flixo or THERM for critical junctions – much quicker. Then if the assembly/detail is marginal we can do a more accurate check with WUFI (either the one or two dimensional versions). Passing the frsi moisture criteria does not mean the building assembly will not mould as it is only valid for the internally exposed surface. Moisture inside the building assembly depends on storage and transmission (vapour permeability & capillary) in the materials and can be quite complicated to assess. That said if the assembly fails the frsi moisture criteria you should redesign the assembly.
The Passive House Institute’s frsi moisture criteria are a ratio made from the local interior cold spot surface temperature, interior air temperature and exterior temperature. This is then compared to a table of critical value for the climate region. See details here. This approach has a few limitations but it is pretty quick, which is why it is the approach we usually take.
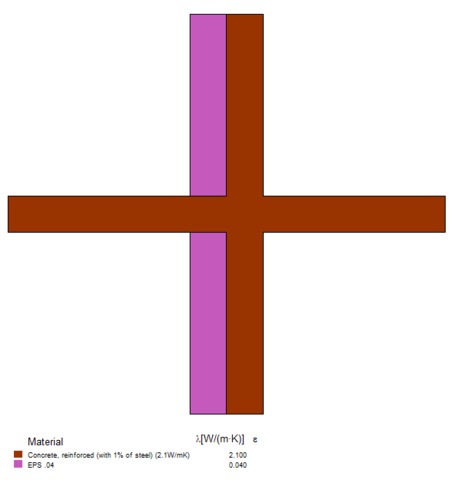
Exterior insulation of building wall with concrete balcony; Outside to the left; Inside to the right.
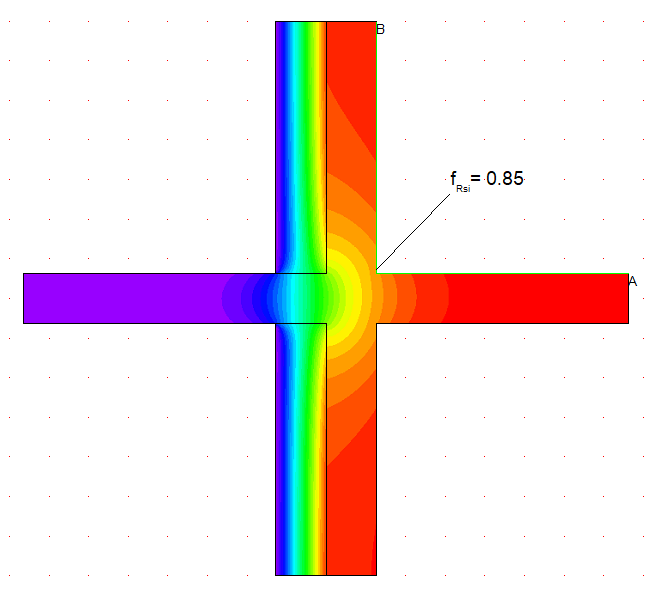
Exterior insulation; frsi =0.85 Passes surface temperature criteria.
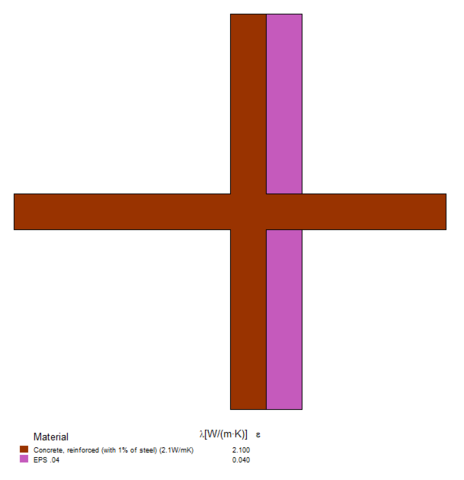
Interior insulation of building wall with concrete balcony; Outside to the left; Inside to the right.
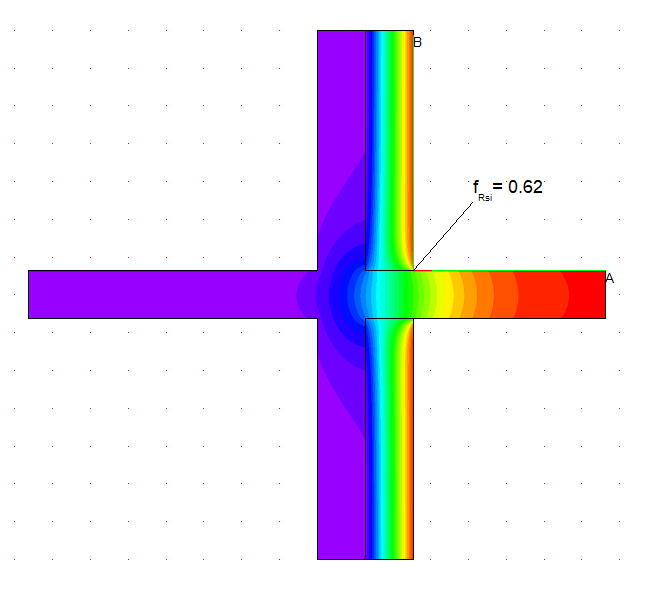
Interior insulation; frsi =0.62 Fails surface temperature criteria.
Figure 1: Un-insulated concrete balcony; Insulation on the concrete walls (R5); A frsi>0.65 is required for most of New Zealand.
Two limitations of all these analysis approaches is they assume you are: 1. ventilating the building properly, i.e. a mechanical ventilation system with heat recovery or at least continuous extract is required and 2. no bulk water leakage into the assembly. Otherwise there is no consistent way to predict what will happen as conditions would depend too heavily on the way the house is lived in or leaks during rainstorms. As an example, if the entire building is always very humid, then mould can grow, no matter how well-designed the building. Similarly, if the roof/wall leaks it doesn’t matter what you picked for assemblies – you are going to have issues. Our analysis always excludes E2 (external moisture) design and impacts due to this.
Back to my mostly concrete building, with internal insulation and heaps of thermal bridges, you can see why I was concerned. Not only was the internal insulation causing moisture issues, internal insulation of any sort caused moisture issues. I simulated the constructions and a few details and showed the issues to my client.
Luckily, at about this point, the design team realised we’d have to scaffold the building anyways. And once we realise we needed to scaffold the building, it became cost-effective to insulate from the outside. Everything became much simpler. A few balconies caused some headaches but, in the end, they ended up with a very good building and a cost-effective insulation strategy. Warm healthy and dry.