
There are three valid options when it comes to testing airtightness of multi-unit buildings targeting Passive House certification—and a fourth way you shouldn’t consider. Here’s how to choose which is the best option for your project.
New Zealand has Passive House certified apartment blocks, townhouses and single-story flats. Each thermal envelope, not each unit, has its own certification and the airtightness certification criteria is applied per thermal envelope, not per dwelling.
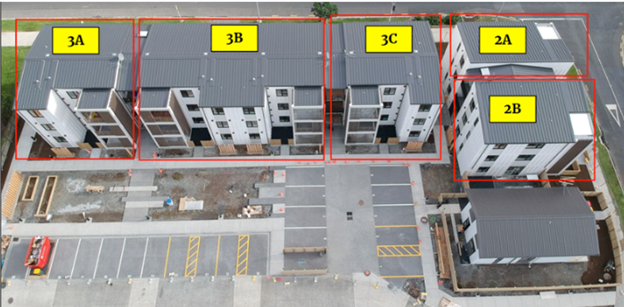
Bader Ventura
- At Bader Ventura, it’s five thermal envelopes because of the breeze ways that separate the apartments, as the image above depicts.
- Leith Street apartments has one thermal envelope for all 19 units.
- Toioroa co-housing is made up of two separate buildings, each with a single thermal envelopes.
- Dunedin City Council Community Housing also has two thermal envelopes.
Different strategies were used for airtightness testing, because there is no clear best option. It depends on the building design, how many blower doors are available and also whether the project is very close to the line with regard to the Passive House airtightness target.
Option 1: Test each individual unit
- One blower door, many tests
- Eg Toiora co-housing
For this section of the Toiora cohousing project, each unit was tested individually, producing a conservative result.
Test airtightness for each unit individually and add up the total leakage. This will record inter-apartment leakage as if they were leaks through the thermal envelope, which they are not, so the result will be conservative. The apartments will perform slightly better than the official result but this is a suitable simplification, so long as the building meets the Passive House target for airtightness.
There is some benefit to testing each unit and including leakage between units, because designers and builders should take care to make apartments airtight to each other. Air leaking between apartments will carry sound and cooking smells as well as heat or coolth so it’s undesirable and should be minimised anyway for occupant comfort and building performance.
Shouldn’t the firewalls required between apartments take care of this? It’s reasonable to think this, but generally incorrect. Wiring often runs between apartments via fire collars and standard installs don’t necessarily airtight these penetrations. Intumescent mastic sealants surround the wiring inside the fire collar and when exposed to heat these expand to fill the gaps. So, airtight in an emergency but Passive House wants airtight all the time. Specify it, and check it.
Main advantage: only need one blower door kit
Main disadvantage: you can’t afford overly-conservative test results if the project is very close to the line.
Option 2: Guarded testing (aka co-pressurisation)
- Two (or more) blower doors, fewer tests
- Eg Bader Ventura
Testing three stacked apartments all at once at Bader Ventura. Red blower door fans are just visible in the doors of three apartments on the left of the photo. Image © Sustainable Engineering
Pressurise all of the volumes that share surfaces with the individual unit being tested to the same pressure at the same time. This is called co-pressurisation or guarded testing and it ensures only air leakage through the thermal envelope is measured.
How many blower doors you need depends on the configuration of the units and could range from two (where the unit being tested shares only one wall with another unit eg a townhouse on the end of the row) to three (a single-story unit with another apartment either side) to five or more for a middle floor apartment.
In the case of Bader Ventura, Oculus used a slightly simplified version of this strategy: they simply tested all the units in each thermal envelope at the same time. So for example, the 3B apartment block required six blower door kits to simultaneously test six apartments.
Main advantage: more accurate result
Main disadvantage: more equipment and more complexity
Option 3: Test a single large volume
- One blower door, one test
This approach is simple, cost-effective and accurate so it’s a clear choice for the subset of instances where all apartments are contained within a single thermal envelope. This would require apartments or townhouses to open onto a hallway that itself was inside the thermal envelope. To conduct the test, open all doors that exit to the hallway, then install a single blower door in an external door or window in one apartment. The entire volume will be pressurised/depressurised and the result is accurate for the thermal envelope as a whole.
Main advantage: accurate result, fast, only requires one blower door kit
Main disadvantage: very few buildings are designed in a way that makes this possible
Don’t do this
I don’t count the next possibility as a viable option. I’m only mentioning it because it has been used overseas and I’ve been asked about approaching the blower door test in this way multiple times. Do not make extra holes in the walls between apartments in order to use one blower door to pressurise the entire thermal envelope. It has a certain kind of appeal but don’t go there. The holes in the wall can’t be small. And the number of council inspections that will be required at different phases of reinstatement will likely eat up any cost and time saving.
Decision pathway
Which strategy you use comes down to this hierarchy of considerations
- the layout of the building
- how close the project is to missing the airtightness requirement
- how many blower doors kits are available.
If you’re undertaking Passive House design for a multi-unit project, it would be prudent to figure out your blower door test strategy at the time of design.